In the previous parts the basis of this app has been setup, now it is time to make it useful!
Below is the overall steps to complete this tiny project.
It is time to use netmiko to connect to a router and gather some data. At my home I have a Cisco 800 series (881 to be exact), and I will connect to it and fetch some data. This data I will present through the Django app I have created. Let me see if I am able to collect some data via Python first (this is pretty much just to follow the guide on Kirk Byers website. Kirk is the author of the netmiko library).
from netmiko import ConnectHandler
device = {}
device['device_type'] = 'cisco_ios'
device['ip'] = '192.168.44.1'
device['username'] = '******'
device['password'] = '******'

conn = ConnectHandler(**device)

output = conn.send_command("show version | i uptime")
print(output)
This should connect to my router, supply the credentials, and execute the command. By running this on my local machine I get the following response:
$python3 netmiko-test.py
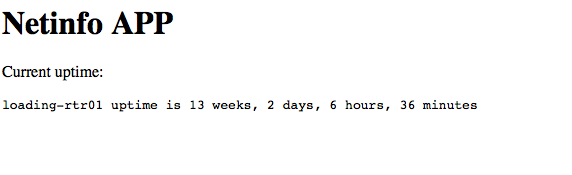
loading-rtr01 uptime is 13 weeks, 2 days, 6 hours, 20 minutesSo it works, great! Now I should try to do the same through Django. As the GCP is on the internet I have to allow SSH connections from the cloud to my router on the internet facing interface. This is not recommended and measures should be taken to only allow specific connections.
When all that is sorted I can start configuring my view.
views.py
def index(request):
        from netmiko import ConnectHandler
        device = {}
        device['device_type'] = 'cisco_ios'
        device['ip'] = '128.77.***.***'
        device['username'] = '*******'
        device['password'] = '*******'
        conn = ConnectHandler(**device)
        output = conn.send_command("show version | i uptime")
return render(request, 'netinfo/index.html', {'output' : output})templates/netinfo/index.html
<h1>Netinfo APP</h1>
<p>Current uptime:</p>
<pre>{{ output }}</pre>Now I can connect to the Django website and load the index view.
So through the tiny bit of code added to the view, every time someone loads the index view an SSH connection is established to the router and the command specified is ran. It’s fine for the demonstration purpose, but not a very flexible solution. Let me add a way of choosing your own command to run.
To expand on the possibilities, I create a form taking one input, a string.
forms.py
from django import forms
class CmdForm(forms.Form):
        command = forms.CharField(label='Command to execute')
Then I have to make some adjustments to the view. Since I am using the same view after executing the command I need to do some checks and return different output and variables depending on what is happening.
views.py
from django.shortcuts import render
from .forms import CmdForm
# Create your views here.
def index(request):
        if request.method == "POST":
                form = CmdForm(request.POST)
                if form.is_valid():
                        from netmiko import ConnectHandler
                        device = {}
                        device['device_type'] = 'cisco_ios'
                        device['ip'] = '128.77.***.***'
                        device['username'] = '********'
                        device['password'] = '********'
                        cmd = request.POST.get('command', '')
                        conn = ConnectHandler(**device)
                        output = conn.send_command(cmd)
                        return render(request, 'netinfo/index.html', {'form' : form, 'output' : output})
        else:
                form = CmdForm()
                return render(request, 'netinfo/index.html', {'form' : form})
The template file is also required to be adjusted a bit.
<h1>Netinfo APP</h1>
<p>Run command:</p>
<form method="POST"> {% csrf_token %}
{{ form }}
<input type="submit" value="Run command!" />
</form>
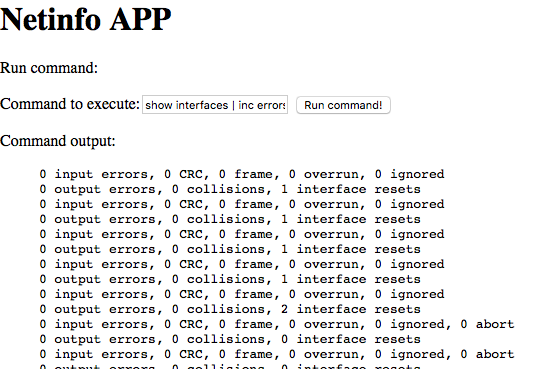
{% if request.POST %}
<p>Command output:</p>
<pre>{{ output }}</pre>
{% endif %}The website now looks like this:
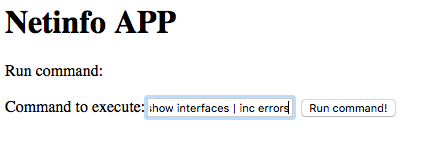
And when submitting the form I now get the response from the command I typed in.
This is a bit more flexible, and it isn’t hard to make it more flexible. With netmiko and Django it is easy to make more complex solutions. Another library which is very good and with a goal of making different vendor implementations easy to interact with is NAPALM.