In part I of this blog posts I installed virtualenv, Django and netmiko. Now I will proceed to create and configure the Django project.
Below is the overall steps to complete this tiny project.
In Django you create a project space, and then you create an app space within that project. Within your virtualenv run the following command to create your new project. A project can have multiple apps, and they can live ‘alone’ or together.
martin_rodvand@netmiko:~/django-netmiko$ django-admin startproject nmikoThis will create a folder named nmiko consisting of manage.py and another folder named nmiko. This last folder is your settings and project folder. Then I continue to create the app. This is where the application lives and where I will do most of the development.
martin_rodvand@netmiko:~/django-netmiko/nmiko$ python manage.py startapp netinfoThis creates a folder named netinfo with its own structure. Django does most of the work for you so the next part is just to start working on the app.
It is possible to test the application by running the built-in development server.
martin_rodvand@netmiko:~/django-netmiko/nmiko$ python manage.py runserver 0:8000
Performing system checks...
System check identified no issues (0 silenced).
You have 14 unapplied migration(s). Your project may not work properly until you apply the migrations for app(s): admin, auth, contenttypes, sessions.
Run 'python manage.py migrate' to apply them.
February 18, 2018 - 08:04:01
Django version 2.0.2, using settings 'nmiko.settings'
Starting development server at http://0:8000/
Quit the server with CONTROL-C.
If you are developing on your local machine, the python manage.py runserver will bind to localhost:8000 by default. As I am running this machine in the cloud I need to bind to more than just the localhost. When binding to a different address than localhost the public address must be added to the ALLOWED_HOSTS variable in nmiko/nmiko/settings.py. Luckily Django will tell you what is wrong through its descriptive error messages.
Django is now configured so the next step is to start configuring some of the views.
So the Django installation is working, but I want something more interesting than just a success page from Django. I want my own pages. This next part is almost verbatim from the Django project’s own tutorial, but it might be useful anyway.
Views are configured in the views.py in each app’s folder. So for the netinfo app I edit netinfo/views.py.
In views.py:
from django.shortcuts import render

def index(request):
	return render(request, 'netinfo/index.html')
I reference a file named netinfo/index.html. This will be my template file for this view. To this file I can pass data, and customise a template to utilise those variables with data. Django has some preconfigured paths it looks for template files, so I will create a folder structure within netinfo named templates/netinfo. Within the folder I create the index.html file:
<h1>Netinfo APP</h1>
<p>This is my netinfo app. Not very impressive yet!</p>
Now I just need to tell Django to show this magnificent web page. The structure will be HOST:8000/netinfo/. If I visit that URL now I get an error page:
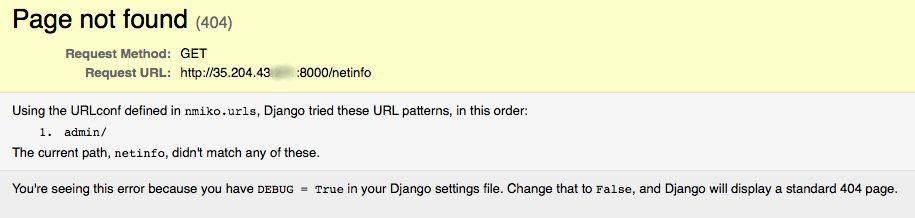
By interpreting the error message I understand that I have nothing connecting the URL I tried to open to the view I have created. So I create a filed in netinfo called urls.py:
from django.urls import path

from . import views
urlpatterns = [
    path('', views.index, name='index'),
]
This just tells the app to present the view index when nothing is supplied. So HOST/netinfo should trigger the index view.
To get this working I also need to edit the urls.py in the nmiko folder.
from django.contrib import admin
from django.urls import include, path
urlpatterns = [
    path('netinfo/', include('netinfo.urls')),
    path('admin/', admin.site.urls),
]
The last thing I need to do is to add my application to the INSTALLED_APPS variable in nmiko/settings.py:
INSTALLED_APPS = [
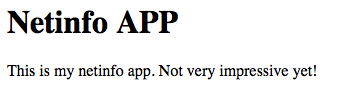
'netinfo',When I now run the development server I can browse to HOST/netinfo and be presented with the view I have made:
The next step now is to use the netmiko library to fetch some information from a networking device and present it on the site. That’s coming in part III.